 |
How To Build Your Own |
|
How To Build Your Own |
I have been wanting to build this furnace for quite a while but I had no success finding local merchants who carried the ingredients that most people say makes a good castable refractory. I was even going to try Lionel's "Chimney Pipe Furnace" and bypass the refractory casting but then found that neither Lowe's nor Home Depot carried terra cotta chimney pipe. My refractory quest and solution is described in my "mini electric kiln" article.
I wanted a furnace I could melt several pounds of aluminum in and I wanted to use wood for the heat. Propane is so expensive these days! There is a large wooded lot behind my house with lots of storm-downed, dead trees and I look at it as fuel for my wood stove and my foundry. If I have to make charcoal, I will, but I think with enough air being blown in and enough babysitting (I've got a lot more time than money), I can get the aluminum up to pouring temperature with just wood. We will see.
I have already tried one firing using only a computer muffin fan attached to a pipe for the air flow and it got the aluminum in the crucible to the "crumbling point" where it just crumbled when I poked it with a welding rod. When I blew a little compressed air through the fan to help it, the furnace really came to life and I realized how much better it will work with a better blower. So later I rigged up a hose to an old discarded carpet cleaner that really moves the air. It works great.
How I built the furnace...
 My eyeball told me to make the outer form 16" diameter and the inner form 10.5". My eyeball is right some of the time and I didn't have any better ideas so I went with that. |
Basic layout Since I planned to use wood, I knew I needed a large burn chamber. I eyeballed several old barrels and plastic pails and such, but could not seem to find the right combination. Then I remembered I had a roll of flashing left over from when I roofed my house. So I just used it to make my own forms to what ever diameter I wanted. All it took was a few pop-rivets! The thing in the middle is a steel cylinder insert from a Catapillar bulldozer. I was planning to use it as a crucible but now, after more reading, I think it is too thin walled. Since the flashing was only 9.5" tall, I decided to cast the bottom first and add the walls on top of it. I didn't take pictures of that operation so you will have to use your imagination, but I just used the outer metal form and poured about a 2.5" thick layer of mix in it and let it set up. Also, to hold the walls and bottom together, I bent 6 pieces of welding rod into 3" squares which I embeded halfway into the mix, so that the other half would be embeded in the walls when they were poured. I did this on a large aluminum-framed window pane since it was so smooth and flat and I figured the mix would turn loose of it easier than from wood, which it did. |
One thing my eyeball forgot to tell me was that a couple of rivets holding the form together were going to give me a hard time when I started trying to pull the form off the cured bottom. I should have moved them further up before pouring. I wound up having to drill them out to remove the form.
Another thing I didn't do was to provision for a drain hole in case of catastrophic crucible failure (molten metal spilling out inside the furnace). I may regret that but so far it has not been a problem.
Since I wanted to use the same metal outer form for the bottom, lid and the walls, once I made the walls, that metal form was not going anywhere so I needed to make the lid next. The glass pane produced a nice smooth surface on the base so I am using it again for the lid. It also provided lots of glare from the camera flash!
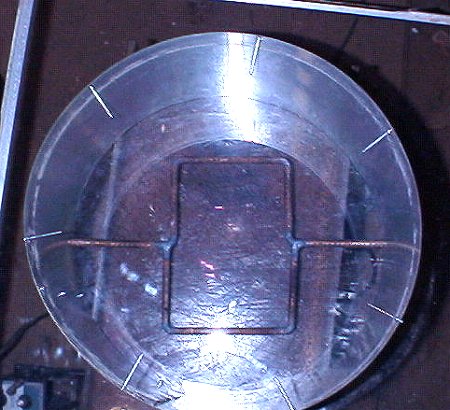
I needed a lid with two pivot points 180 degrees apart and a chimney hole in the center. So I came up with this. Rebar is pretty easy to bend in a vice if you heat the bend point up to red hot with a torch. Plus, the rebar can do what it was made for... reinforcing concrete. There was an aspect here that I overlooked which is still causing me consternation. That is the balance of the lid. Depending on how much refractory mix is above the rebar and how much is below will determine the balance, ie: if the lid will stay level when you pivot it up and off, or whether it will flip upside down and you will feel stupid. I naturally did the latter. So do a little measuring and make sure you have more refractory on the bottom side of the lid. The spikes you see all around the rim are where I got ahead of myself. Before I realized I had to pour the lid next, I was preparing to pour the walls. The spikes are pop-rivets, crimped but not quite popped off. They are to keep the metal form from slipping down around the base thus giving a little extra height to the walls. They are about 3/8" from the edge. |
|
|
The Poured Lid
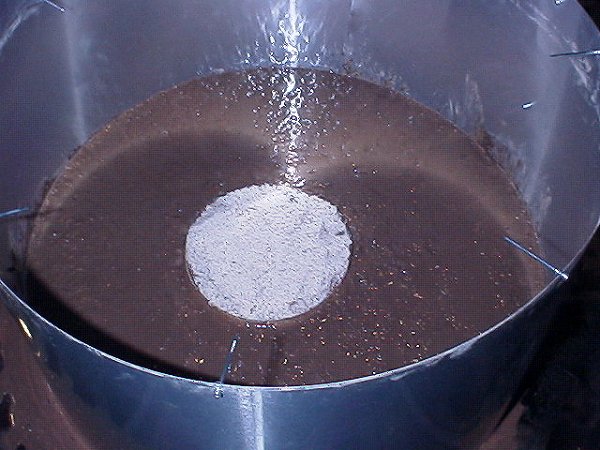
Mmmmmm.... looks tasty doesn't it? There are lots of ways to make the chimney hole. I've read about using dixie cups and beer cans and so on. Well I had already butchered a 3 liter plastic pop bottle with the Dremel tool for a different project and its decapitated head was lying on the bench. Another zip with the tool and the neck was gone and I had a nice gently slopeing form for the chimney hole. I filled it with sand so it would not float off. After the pours for both the base and top, I went through the whole get-the-air-bubbles-out ritual just like in the kiln article, only here the screwdriver handle was replaced by a block of wood for the impact. Sand or no sand, this thing still managed to drift slightly off center and I could not convince it to go back, so I wound up with a center hole that was not a center hole.
|
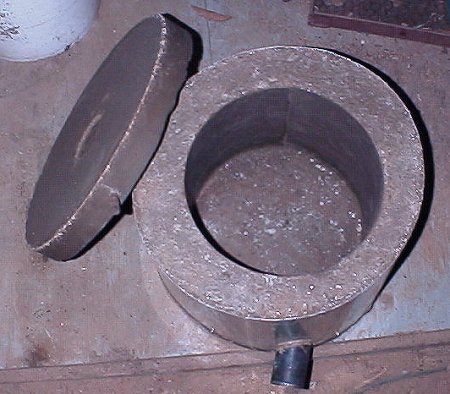
A day later and it is firm enough to remove the forms. Since the rebar was sticking through the metal form on both sides, to get it off I had to make small cuts in the flashing from the rebar down to the glass and bend the thin metal back. Did this on both sides and the form came off pretty easily. It is no longer red clay colored because I might have added a little too much water. So much water collected on top of the mix that I sprinkled some dry portland cement on it to soak it up. Didn't help a thing, but it made me feel better. I really liked the chimney hole, slightly off center or not. |
|
 |
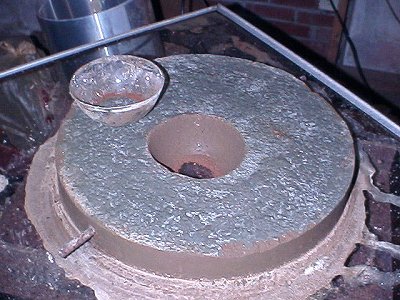
My sprinkled portland was looking pretty rough, so I hauled out the belt sander and totally clogged up a belt but the results were worth it. Opps...I forgot to turn on the camera flash. A couple of more days and it will be ready to remove from the glass for more air drying. I found that you can push, pull and tug all you want and it won't let go of the glass, but if you carefully turn it over and lift one corner of the glass and hold it there, you can see it slowly turning loose of the glass and it will finally pop right off by gravity alone. |
Let there be walls!
Whew... you still with me? There's more to this than I thought!
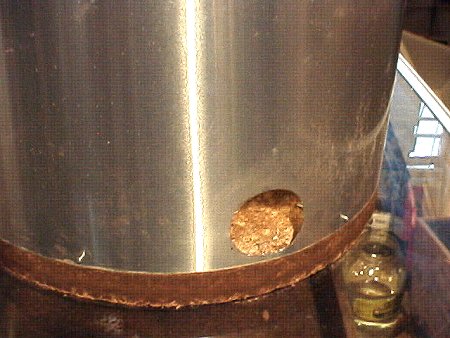
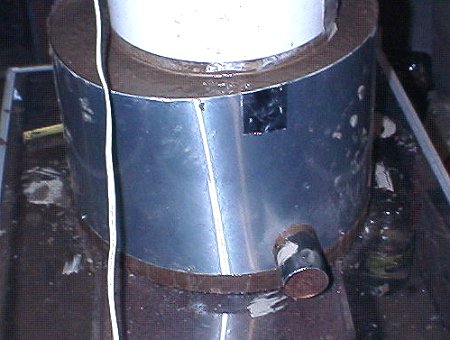
Part one: Gimme Air! I had a 3" thin-walled black pipe in the junk pile and I just happened to have a 3" hole saw so I decided 3" sounded pretty good to me. I elongated the hole a bit (although it doesn't look like it in the picture) so that the pipe could be at an angle where it shoots the air around the chamber rather than blowing cool air directly on the crucible which is counter-productive. You can see the un-popped pop-rivets doing their job getting a little extra height. The outer form is only overlapping the base by about 3/8". I don't know why I'm still doing assembly on the glass. Guess it is the only truly flat surface in the whole shop. |
|
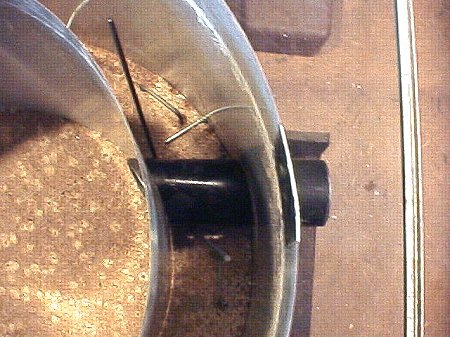 |
Here the air pipe is inserted. I know, it still looks like it is pointed at the crucible area, but that will be adjusted. To keep the air pipe from breaking loose from the wall material and doing its own thing, I brazed a bent welding rod to it which the wall material can also hold. Notice the 3" welding rod squares spaced around the ring to secure the walls to the base. The silver patch on the lip is a piece of metal duct tape to cover the hole and cut made during the lid making process so wall material does not ooze out. Yes, duct tape! Duck tape holds ducks together and they don't sell it around here! grumble...idiots!....grumble... |
Okay, the glass may be flat, but that does not mean it is level! Actually, it is not as bad as it looks. The camera angle and the white bucket are both off-vertical. Got it filled with goop and it is not bleeding too badly anywhere. As many how-to's as I have read... they all said to put something in the center to keep the walls from collapsing in when you start adding the refractory, I plain forgot. I just had some weight on top of the metal forms to keep it from seeping underneath. After the walls started buckling I had a frantic few minutes finding something... anything!... to stuff in there. I finally found a wooden disc the right size to shove to the bottom of the center form and a tapered white bucket did a perfect job for the top. I could have just packed the center with dirt or sand. I also grossly underestimated how much mix it would take to fill the walls and had to mix up two emergency batches in the wheelbarrow to top it up. |
|
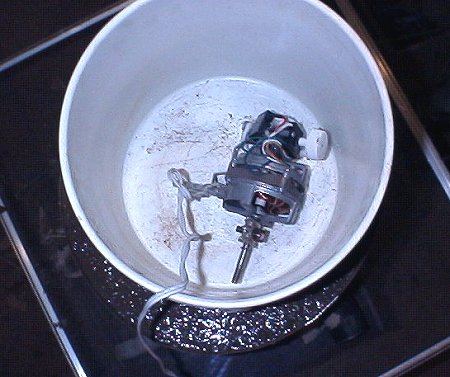 |
I know there is a lot of air in there, but I'm not going to beat on that aluminum window frame with a chunk of wood for an hour and a half! Hmmmm... need something that will make a lot of vibration... Aha! a motor with an off-balance load! Great for the bearings! Turn it on, drop it in the bucket and watch the bubbles rise. I used a motor out of a relatively new table-top oscillating fan that someone (not me, really!) destroyed in a fit of anger. I just destroy them when they oscillate. I find that really irritating. It is hard to see in the photo but there is a heavy steel cable clamp clamped onto the motor shaft. The motor jumped and twisted (see the cord?) and did a pretty good job of making the air bubbles rise. |
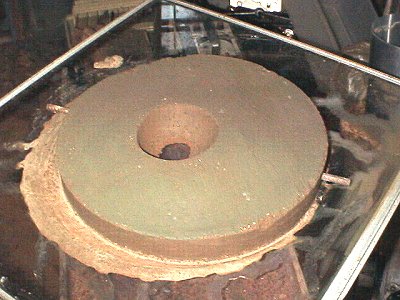
TAH-DAH! Couple of days later.
I don't know how heavy this thing is. I just know I about dropped a nut getting it lifted off the glass and setting it on the floor.
Alas, the glass. To get my fingers under the thing to lift it, I had to tilt it. That put all the weight on one point of my venerable glass pane and it gave in to the pressure. Very sad. |
|
 |
|
|
Now to just wait a week or two while the 75 watt light bulb does its thing removing moisture. Then I will build a small fire in it and let it dry some more before I build a serious fire in it. |
|
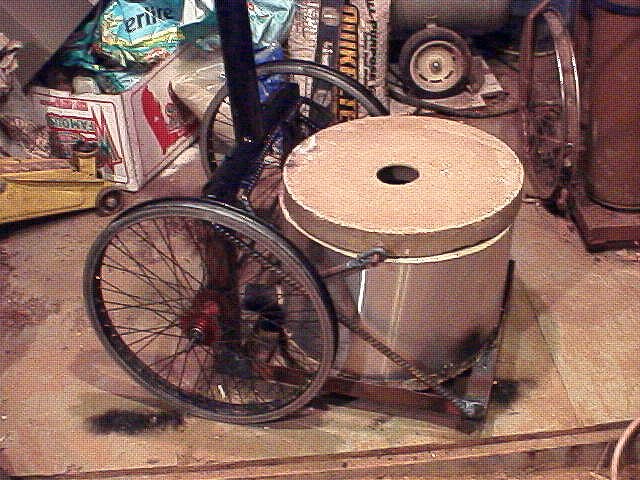
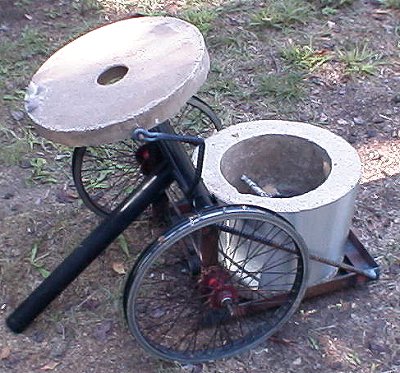
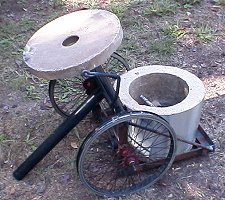
11/12/07 -- This project finished now. I have built a good cart to transport the foundry and I have converted the remains of a discarded steam vac carpet cleaner to make a good blower (overkill). I have built some crude but functional handtools to manipulate the crucible.
For the cart I used 16" bicycle rims for wheels because small wheels with a lot of weight on them will jam on every pebble in their path. This was a lesson I learned the hard way back in 1975 when I built the cart for my oxy/acetylene tanks seen on the right in the picture.
|
The long black handle has a dual purpose. When two bolts are dropped into holes, it is locked and acts as a handle to tilt the furnace back on the wheels for transporting. When the bolts are withdrawn, the handle will instead just lift the lid and retract it out of the way and gravity holds it back in place. The idea for this design came from a furnace built by Lionel Oliver II of "Lionel's Lab" fame. His site is stuffed full of interesting projects and how-to's plus he offers his own "The HobbyMelter™ furnace kit" for people who may not have access to welding equipment and other tools needed to fabricate from scratch. http://www.backyardmetalcasting.com/ is a must see. His kit furnace was where I got the idea for the lid lifter. Thanks Lionel |
|
To the next page... the tools I made.